
Bathroom Remodel Mistakes That Cost Homeowners Thousands

The ten bathroom remodel mistakes that drain the most money are: buying fixtures before the layout is finalized, skipping or undersizing the exhaust fan, ignoring toilet rough-in dimensions and door-swing clearances, cutting corners on shower waterproofing and pan slope, choosing tile or grout unsuited for wet rooms, relying on a single overhead light, selecting materials not rated for humidity, underestimating the true cost and timeline, DIYing plumbing or electrical work, and demolishing before confirming permits and rough-in compatibility. Fix each one by following the contractor-backed checklist below, grounded in ADA design standards, NKBA clearance guidelines, and the systems-first approach recommended by industry sources like The Spruce.
Buying before the plan is final. Fix: freeze all fixture purchases until rough-in measurements are confirmed on paper.
Undersized or missing exhaust fan. Fix: size to at least 1 CFM per square foot for bathrooms under 100 sq ft and duct to the exterior.
Wrong toilet rough-in or door swing. Fix: measure the rough-in distance before ordering any toilet; confirm door swing clears all fixtures.
No waterproofing membrane in the shower. Fix: require a bonded membrane and a documented flood test before tile goes down.
Wrong tile or grout for wet areas. Fix: specify DCOF-rated floor tile and sanded or epoxy grout rated for wet rooms.
Single overhead light only. Fix: layer ambient, task (sconces at eye level), and accent lighting on separate circuits.
Non-moisture-rated materials. Fix: use porcelain tile, waterproof LVP, or marine-grade plywood for vanity carcasses.
No contingency budget. Fix: add a contingency to every line item before signing a contract.
DIY plumbing or electrical. Fix: hire licensed trades for anything touching supply lines, drain slopes, or panel circuits.
Demolishing without permits. Fix: pull permits and confirm all rough-in specs before the first wall comes down.
Key Takeaways
The most expensive bathroom remodel mistakes share one root cause: prioritizing visible finishes over the hidden systems that determine whether a bathroom lasts five years or twenty-five.
Point | Details |
Finalize layout before buying | Freeze all fixture purchases until rough-in measurements are confirmed in the open wall. |
Size ventilation correctly | Specify at least 1 CFM per square foot, HVI-certified, ducted to the exterior with rigid pipe. |
Require waterproofing documentation | Insist on a bonded membrane, a 24-hour flood test, and written sign-off before tile installation begins. |
Budget with an appropriate contingency | Hidden costs from demo surprises, permit fees, and material delays are the rule, not the exception. |
Coastalhrli for Suffolk County remodels | Coastalhrli handles licensed trades, permits, staged inspections, and documented waterproofing on every bathroom project. |
Table of Contents
What are the most common bathroom remodel mistakes when buying fixtures early?
Why does skipping ventilation cause so much damage in bathrooms?
How do layout clearances and toilet rough-in affect your bathroom design?
How does poor lighting ruin an otherwise well-designed bathroom?
Which materials should you avoid in a high-humidity bathroom?
Why do bathroom remodel budgets go over, and how do you prevent it?
When should you hire a licensed pro instead of doing it yourself?
Why does a systems-first approach prevent the most expensive failures?
Pre-demolition checklist: 12 things to confirm before swinging the hammer
Are you overlooking accessibility and universal design in your bathroom?
What happens when you skip permits and ignore local building codes?
Why does electrical outlet placement matter so much in a bathroom?
Is your bathroom heating plan actually going to keep you comfortable?
How does poor storage planning create long-term frustration?
What the most common bathroom failures actually look like in practice
Coastalhrli brings 20 years of systems-first bathroom remodeling to Suffolk County
What are the most common bathroom remodel mistakes when buying fixtures early?
Buying a vanity, toilet, or tub before the layout is locked in is one of the most expensive planning errors a homeowner can make. The fixture arrives, the rough-in doesn’t match, and suddenly you’re paying for a change order, a return shipping fee, or a custom plumbing relocation. Multiple homeowner regret stories point to this exact sequence: excitement drives early purchases, and early purchases drive mid-project chaos.
The consequences compound fast. A toilet ordered for a 12-inch rough-in won’t fit a 10-inch rough-in without moving the drain. A freestanding tub that looks perfect in a showroom may require floor reinforcement your existing joists can’t handle. A prefab shower unit might be two inches too wide for the alcove once framing is in.
Before spending a dollar on fixtures or finishes, confirm every item on this checklist:
Measure the room in its current state, including ceiling height, window placement, and all existing rough-in locations.
Verify the toilet rough-in distance (floor drain center to finished wall).
Confirm the door swing radius and whether it conflicts with any planned fixture.
Check permit requirements with your local building department.
Establish a realistic timeline with your contractor, including lead times for special-order items.
Get written sign-off on the final layout from your contractor before placing any orders.
Pro Tip: Wait until your contractor has opened the walls and confirmed actual rough-in locations before ordering anything with a fixed drain or supply connection. Manufacturer specs assume ideal conditions; your walls rarely are.
Why does skipping ventilation cause so much damage in bathrooms?
Inadequate ventilation is the single most common cause of mold, peeling paint, and rotting subfloors in bathrooms — and it’s almost always preventable. The mistake isn’t always skipping the fan entirely; more often, homeowners install a fan that’s too small, duct it into the attic instead of the exterior, or skip the humidity sensor that would actually run it long enough to matter.
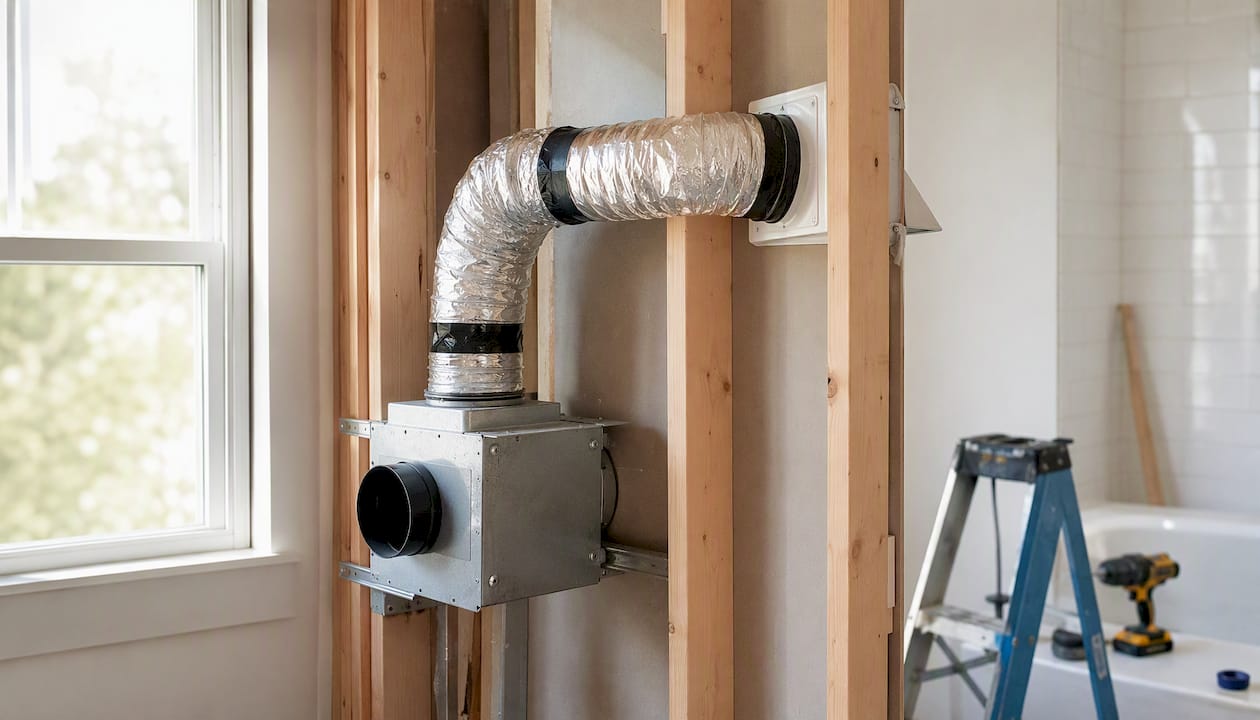
Proper fan sizing starts at 1 CFM per square foot for bathrooms under 100 sq ft. For larger bathrooms or those with a jetted tub, add 50–100 CFM on top of the base calculation. Always look for the HVI (Home Ventilating Institute) rating on the box — it’s the only third-party certification that confirms the fan actually moves the air it claims to.
Here’s how to get it right:
Calculate your bathroom’s square footage and multiply by 1 to get your minimum CFM rating.
Add 50 CFM if the bathroom includes a jetted tub or a large walk-in shower.
Choose an HVI-certified fan rated for your CFM requirement.
Duct with rigid metal pipe (not flex duct, which traps moisture) directly to an exterior wall or roof cap — never into the attic.
Install a timer switch or humidity-sensing control so the fan runs 15–20 minutes after the bathroom is vacated.
Seal all duct joints with foil tape rated for HVAC use.
Pro Tip: After installation, hold a piece of toilet paper near the fan grille with the fan running. If it doesn’t hold flat against the grille, the fan isn’t moving enough air — either the duct run is too long, has too many bends, or the fan is undersized for the space.
How do layout clearances and toilet rough-in affect your bathroom design?
Layout errors are the renovation pitfalls that feel minor on paper and catastrophic in person. A toilet centered too close to a side wall, a vanity door that swings into the shower entry, a shower threshold that’s an inch too high for comfortable stepping — these aren’t aesthetic complaints. They make a bathroom uncomfortable to use every single day.
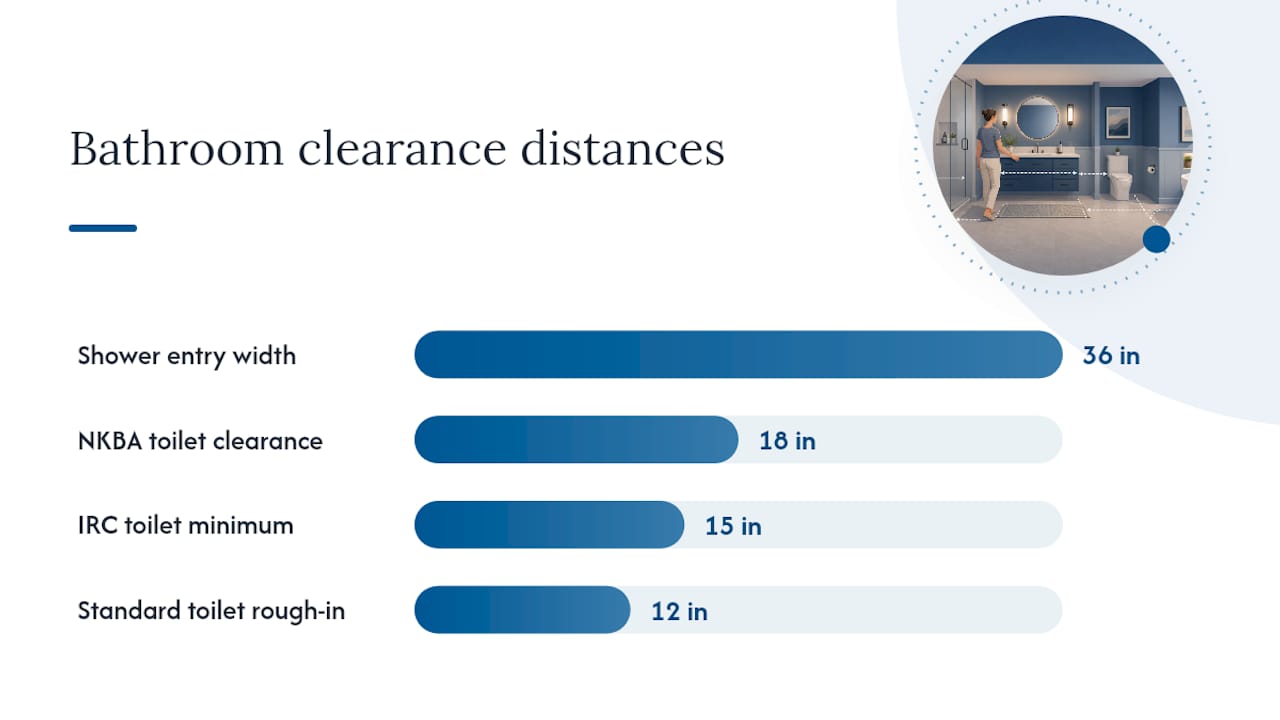
The NKBA (National Kitchen and Bath Association) recommends a minimum 18-inch clearance from the toilet centerline to any side wall or obstruction. The IRC (International Residential Code) allows 15 inches in some jurisdictions, but that’s a code floor, not a comfort standard. The difference between 15 and 18 inches is the difference between a bathroom that feels tight and one that feels normal.
Toilet rough-in distance is the measurement from the finished wall to the center of the floor drain. Standard is 12 inches, but older homes frequently have 10-inch or 14-inch rough-ins. Order the wrong toilet and you’re either relocating the drain or returning the fixture.
Before demo, walk through this layout checklist:
Measure the existing rough-in distance for the toilet.
Confirm the door swing radius and mark it on a floor plan.
Verify that all fixture clearances meet NKBA minimums (not just IRC).
Check that the shower entry is at least 36 inches wide.
Confirm that ADA design standards clearances are met if any household member uses mobility aids.
Pro Tip: Tape out the footprint of every fixture on the subfloor before framing begins. Walking through the space with masking tape outlines reveals clearance conflicts that a floor plan on paper never will.
What shower waterproofing details do most homeowners miss?
Tile and grout are not waterproof. That’s the single most important thing to understand about shower construction, and it’s the point that waterproofing experts consistently emphasize. Water migrates through grout joints, through tile edges, and through any penetration in the substrate. Without a continuous bonded membrane behind the tile, that water reaches the framing, the subfloor, and eventually the ceiling below.
The two most common shower waterproofing failures are: no membrane at all (just cement board and tile), and a membrane that stops short at transitions — the curb, the niche, the floor-to-wall junction. Every one of those transitions needs to be fully wrapped and sealed.
Before any tile goes down, confirm these items:
A bonded waterproofing membrane (sheet membrane or liquid-applied) covers all shower walls from the pan to at least 6 inches above the showerhead height.
The shower pan slopes at 1/4 inch per foot toward the drain on all sides.
The membrane wraps continuously over the curb and into the niche recesses.
A flood test has been performed: plug the drain, fill the pan with 2 inches of water, and wait 24 hours. Zero water loss is the standard.
The drain flange is compatible with the membrane system — mixing brands can void both warranties.
All penetrations (supply lines, niche corners) are sealed with the membrane manufacturer’s recommended sealant.
Pro Tip: Ask your contractor to photograph the completed membrane and flood test before tile installation begins. That documentation protects you if a leak appears years later and a warranty claim is needed.
Are you choosing the right tile and grout for a wet room?
Not all tile is appropriate for shower floors, and not all grout holds up in a wet environment. This is one of those bathroom renovation pitfalls where the wrong choice looks fine for 18 months and then fails spectacularly — cracked grout, stained joints, tile that chips because it was too porous for the freeze-thaw cycle near an exterior wall.
For shower floors, specify tile with a DCOF (Dynamic Coefficient of Friction) rating of 0.42 or higher — that’s the ANSI A137.1 standard for wet, barefoot surfaces.
Key material decisions to get right:
Substrate: Use cement board (like Durock or HardieBacker) or a foam tile backer (like Schluter Kerdi-Board) — never standard drywall in wet zones, even “moisture-resistant” drywall behind tile.
Adhesive: Use a polymer-modified thinset rated for the tile size and substrate. Large-format tiles (over 15 inches) need a medium-bed mortar to prevent lippage.
Grout: Sanded grout for joints wider than 1/8 inch; unsanded for narrower joints. Epoxy grout is the most stain-resistant option for shower floors but requires more skill to apply.
Grout color: Light grout shows staining faster; dark grout shows efflorescence. Mid-tone grays and taupes tend to age the most gracefully in high-use showers.
Sealing: Cement-based grout needs sealing after cure and annually thereafter. Epoxy grout does not.
Cuts, breakage, and future repairs all require matching tile — and discontinued colors are a real problem three years after installation.*
How does poor lighting ruin an otherwise well-designed bathroom?
A single recessed can in the ceiling is the default lighting plan in most builder-grade bathrooms, and it’s the reason so many people look washed out and shadowy when standing at the mirror. Overhead-only lighting casts shadows directly onto the face — the opposite of what task lighting at a vanity needs to do.
The fix is layered lighting: ambient (ceiling fixtures for general illumination), task (sconces or a lighted mirror at eye level for grooming), and accent (under-cabinet or toe-kick lighting for nighttime navigation). Each layer should be on a separate dimmer circuit so you can adjust for morning routines, evening baths, and everything in between.
A practical lighting checklist:
Place vanity sconces at 60–65 inches from the floor to the center of the fixture — that’s eye level for most adults.
If using a single lighted mirror instead of sconces, choose one with a color temperature of 2700–3000K (warm white) for accurate skin-tone rendering.
Install a separate ambient fixture (recessed or surface-mounted) on a dimmer for general use.
All fixtures within 6 feet of the tub or shower must be rated for damp or wet locations per NEC requirements.
All outlets and switches must be GFCI-protected (more on that below).
Pre-wire for a dimmer on every circuit, even if you install standard switches now — the rough-in cost is negligible; retrofitting later is not.
Pro Tip: Run a dedicated circuit for a heated mirror or medicine cabinet with integrated lighting before the walls close. The wiring cost at rough-in stage is a fraction of what it costs to open a finished wall later.
Which materials should you avoid in a high-humidity bathroom?
The bathroom is the most demanding environment in a house for building materials. Temperature swings, standing water, steam, and cleaning chemicals combine to destroy anything not specifically designed for wet conditions. This is where prioritizing moisture-resistant systems over surface aesthetics pays off most directly.
Use these:
Porcelain tile (floor and walls in wet zones)
Waterproof luxury vinyl plank (LVP) rated for wet areas, for floors outside the shower
Marine-grade plywood or exterior-grade plywood with a sealed, painted finish for vanity carcasses
Solid surface, quartz, or porcelain for countertops
Stainless steel, brass, or powder-coated hardware (not chrome-plated zinc in high-humidity zones)
Avoid these:
Standard particleboard or MDF cabinet boxes — they swell and delaminate within two to three years in a bathroom
Unsealed natural wood in direct-splash zones
Standard drywall (even “green board”) behind tile or in shower surrounds
Laminate flooring not rated for wet areas
Oil-based paints without a mold-inhibiting additive in the primer coat
Pro Tip: Seal the wall cavity behind the vanity with a vapor retarder paint or a sheet membrane before installing the cabinet. That cavity sits directly above the supply lines and sees more humidity than most homeowners realize.
Why do bathroom remodel budgets go over, and how do you prevent it?
Budget overruns and compressed timelines are the two forces most likely to push homeowners into poor decisions mid-project. Failing to set a realistic budget from the start is one of the most frequently cited renovation mistakes, and the fix isn’t just adding a contingency line — it’s understanding where the hidden costs actually live.
A cosmetic refresh (new fixtures, paint, hardware) can fit a modest budget. A full remodel that moves plumbing, changes the layout, or addresses structural issues costs significantly more. Contractor guidance suggests that a budget around $10,000 covers cosmetic updates but is unlikely to fund a full-scale remodel involving layout changes or plumbing relocation.
Common hidden costs that blow budgets:
Rotted subfloor or framing discovered after demo
Out-of-date plumbing (galvanized pipe, cast iron drain lines) that must be replaced to code
Electrical panel upgrades required to support new circuits
Permit fees and inspection costs (often overlooked entirely)
Change orders from fixture incompatibility or late design decisions
Extended contractor time from material delays on special-order items
A realistic timeline with decision deadlines:
Weeks 1–2: Finalize layout, confirm rough-in specs, select all fixtures and finishes.
Week 3: Submit permit application; order long-lead items (tile, vanity, specialty fixtures).
Weeks 4–5: Demo and rough-in work.
Week 6: Pre-cover inspection; waterproofing installation.
Weeks 7–9: Tile, drywall, and finishes.
Weeks 10–11: Fixture installation, trim, and punch list.
Week 12: Final inspection and certificate of occupancy (if required).
Pro Tip: *Stage payments to match completed milestones, not calendar dates. A large up-front deposit before work begins gives you little leverage if the project stalls.
When should you hire a licensed pro instead of doing it yourself?
Cosmetic work — painting, swapping hardware, installing a new mirror, replacing a toilet seat — is genuinely DIY-friendly. Everything that touches supply lines, drain slopes, panel circuits, or structural waterproofing is a different category entirely. The risk isn’t just a failed inspection; it’s a hidden leak that destroys a floor, a wiring error that creates a shock hazard, or a drain slope problem that causes chronic backups.
Licensed pros are recommended for plumbing, electrical, and shower installations because errors in those trades create failures that are expensive to find and even more expensive to fix after walls are closed. Beyond the technical risk, unpermitted work done by unlicensed contractors can void homeowner’s insurance and create title problems when you sell.
Risks of DIYing complex trades:
Improper drain slope (the standard is 1/4 inch per foot) causes standing water and chronic clogs
Code violations on electrical work can trigger a full panel inspection at resale
Shower waterproofing errors that aren’t caught before tiling require full demo to fix
Unlicensed plumbing work may not be covered if a leak causes water damage
Before hiring any contractor, work through these verification steps:
Verify the contractor’s license with your state licensing board (in New York, check the NYS Department of State).
Confirm they carry general liability and workers’ compensation insurance — ask for certificates, not just verbal confirmation.
Ask who pulls the permit: the contractor should pull it, not the homeowner acting as their own GC for licensed trade work.
Schedule a pre-cover inspection (before drywall goes up) to verify rough-in work.
Request a flood test sign-off before tile installation begins.
Get a lien waiver from every subcontractor and supplier before final payment.
For door-related clearance issues during a remodel, common door-installation pitfalls — including swing conflicts and hardware placement errors — are worth reviewing before framing is finalized.
What is the correct order to remodel a bathroom?
Sequence errors are responsible for a surprising share of rework costs. Tiling before the pre-cover inspection, installing fixtures before waterproofing is complete, or finishing walls before electrical rough-in is signed off — each one creates a situation where finished work has to be torn out to fix what’s underneath.
The correct sequence, in order:
Demo: Remove existing fixtures, tile, drywall, and flooring. Protect adjacent rooms from dust and debris.
Plumbing rough-in: Relocate or extend supply and drain lines to match the new layout.
Electrical rough-in: Run new circuits, add GFCI protection, and pre-wire for fans, heated floors, and specialty fixtures.
HVAC/ventilation rough-in: Install the exhaust fan housing and duct run before walls close.
Pre-cover inspection: A building inspector reviews all rough-in work before any wall covering goes up. This is non-negotiable in permitted projects.
Waterproofing: Install shower pan liner or bonded membrane, flood test, and document.
Cement board/backer installation: Walls and floor substrate go in after waterproofing is confirmed.
Tile and finishes: Floor tile first, then wall tile, then drywall finishing in non-wet areas.
Trim and paint: Door casings, baseboard, and wall paint after tile is grouted and cured.
Fixture installation: Vanity, toilet, shower fixtures, mirrors, and accessories.
Final inspection: Building inspector signs off on completed work; certificate of occupancy issued if required.
Home Depot’s remodeling sequence guidance aligns with this order and emphasizes that skipping the pre-cover inspection is one of the most common causes of failed final inspections.
Why does a systems-first approach prevent the most expensive failures?
The most experienced contractors don’t start a bathroom remodel by talking about tile. They start by talking about moisture management, structural integrity, and ergonomic clearances. That systems-first approach is what separates a bathroom that performs for 20 years from one that needs remediation in five.
A systems-first approach means budgeting more toward the work you’ll never see — the membrane, the fan, the properly sloped drain, the correctly sized circuits — and less toward the finish selections that get all the attention in design magazines. It also means asking the right questions of every contractor who bids the job.
Here’s what every bid should include in writing:
A waterproofing plan specifying the membrane system, manufacturer, and flood test protocol.
A ventilation spec with CFM rating, HVI certification, and duct routing diagram.
A plumbing scope that identifies existing pipe material and any required upgrades.
A permit plan listing which permits will be pulled and by whom.
A project milestone schedule with inspection dates and homeowner decision deadlines.
Beyond the bid, watch how the budget is allocated.
Pro Tip: Ask every contractor to provide a written waterproofing plan before signing. If they can’t describe the membrane system they’ll use and the flood test protocol, that’s a signal to keep interviewing.
Pre-demolition checklist: 12 things to confirm before swinging the hammer
Confirming these items before demolition begins prevents the most expensive surprises once walls come down. Hand this list to your contractor at the pre-construction meeting and ask for written confirmation on each item.
Plumbing age and condition: Identify pipe material (copper, PVC, galvanized, cast iron). Galvanized and cast iron may need replacement before new fixtures connect.
Electrical scope: Confirm panel capacity for new circuits. Identify existing circuit loads and GFCI locations.
Permit requirements: Contact your local building department to confirm which permits are required. In Suffolk County, bathroom remodels involving plumbing or electrical work typically require permits.
Fixture rough-in compatibility: Verify toilet rough-in, tub/shower drain location, and supply line positions against your selected fixtures.
Material lead times: Confirm delivery windows for all special-order items. Don’t demo until long-lead materials are ordered and confirmed.
Temporary facilities: If this is the only bathroom, arrange alternative facilities for the duration of the project.
Water shutoffs: Locate and test the main shutoff and any branch shutoffs serving the bathroom.
Insurance contact: Notify your homeowner’s insurance carrier before work begins, especially if structural changes are involved.
Contractor insurance and license: Collect certificates of insurance and license numbers before demo day.
Schedule buffer: Build at least a two-week buffer into the timeline for inspection delays and material issues.
Fixtures on-site or confirmed: All fixtures with fixed rough-in requirements should be on-site or have confirmed delivery dates before demo begins.
Waste disposal plan: Confirm how demo debris will be removed and where it will go. Dumpster permits may be required in some municipalities.
Use this checklist at the pre-construction walkthrough. Go through each item with your contractor and get written confirmation. Any item that can’t be confirmed is a reason to delay demo, not proceed and hope.
Are you overlooking accessibility and universal design in your bathroom?
Most homeowners design their bathroom for how they live today, not how they might live in ten years. A remodel is the lowest-cost opportunity to build in accessibility features — and skipping it means paying full renovation costs again later if circumstances change.
ADA design standards provide specific dimensions for accessible fixtures and clearances. Even if full ADA compliance isn’t required for a private residence, designing to those standards future-proofs the space. A 36-inch-wide shower entry, blocking in the walls for future grab bars, a comfort-height toilet (17–19 inches), and a curbless shower entry are all changes that cost little at rough-in and a great deal to retrofit later.
Universal design principles worth building in now: curbless shower entries eliminate a trip hazard for everyone; lever-style faucet handles are easier for arthritic hands and children alike; wider doorways (at least 32 inches clear) accommodate walkers and wheelchairs without looking institutional. None of these require a medical-equipment aesthetic — they’re just smart design.
What happens when you skip permits and ignore local building codes?
Unpermitted bathroom work is one of the most common and most consequential renovation pitfalls. The immediate risk is a stop-work order and mandatory demolition of completed work. The longer-term risk is a failed home inspection at resale, a voided homeowner’s insurance claim after a water loss, and personal liability if unpermitted electrical work causes a fire or injury.
In Suffolk County and across New York State, bathroom remodels involving plumbing changes, electrical work, or structural modifications require permits. The permit process exists to trigger inspections at key milestones — pre-cover, rough-in, and final — that catch errors before they’re buried in finished walls.
The permit fee is a small fraction of the cost of tearing out finished tile to satisfy an inspector. Pull the permit, schedule the inspections, and get the sign-offs in writing. A contractor who suggests skipping permits to save time or money is telling you something important about how they work.
Why does electrical outlet placement matter so much in a bathroom?
Bathroom electrical errors range from inconvenient to genuinely dangerous. The NEC (National Electrical Code) requires GFCI protection for all outlets within 6 feet of a water source — that’s the minimum. In practice, every outlet in a bathroom should be GFCI-protected, and the placement of those outlets matters as much as the protection type.
Common placement mistakes: a single outlet behind the vanity that’s blocked by the faucet, no outlet on the wall adjacent to the shower for a shaving mirror or speaker, switches placed where a wet hand can reach them from inside the shower enclosure. The NEC also requires that switches not be located within reach of a person standing in a tub or shower.
Plan for at least two GFCI outlets at the vanity — one on each side if the vanity is wider than 48 inches. If you’re adding a heated towel bar, a bidet seat, or under-cabinet lighting, each needs a dedicated circuit or a properly loaded shared circuit. Wire for those during rough-in; adding circuits after the walls are closed is a full electrical project.
Is your bathroom heating plan actually going to keep you comfortable?
Bathroom heating is an afterthought in most remodels, which is why so many bathrooms feel cold in the morning even when the rest of the house is comfortable. A standard forced-air register in the floor or ceiling is often the only heat source, and it’s rarely positioned to warm the area where you actually stand.
Radiant floor heating is the most effective solution for bathroom comfort. Electric radiant mats (like Nuheat or Schluter Ditra-Heat) install directly under tile and are controlled by a programmable thermostat. They add modest cost at installation and very little to monthly energy bills when used with a timer. The key is installing them before tile goes down — retrofitting radiant heat means removing the floor.
Heated towel bars are a secondary comfort upgrade that also help reduce ambient humidity by warming towels faster. They’re a simple electrical rough-in addition during the remodel phase. Avoid relying solely on a heat lamp for primary bathroom heating — they warm the person directly below them and nothing else, and they’re a poor substitute for a properly sized heat source.
How does poor storage planning create long-term frustration?
A bathroom without adequate storage doesn’t stay organized. Countertops fill with products, cabinet doors stay open because nothing fits properly, and the space feels cluttered regardless of how well it was designed aesthetically. Skimping on storage is one of the most frequently cited renovation regrets, and it’s almost always fixable at the planning stage for very little additional cost.
The most underused storage opportunities in a bathroom remodel: recessed medicine cabinets (they add depth without projecting into the room), niches in shower walls (planned during framing, not as an afterthought), toe-kick drawers under the vanity, and tall linen cabinets in corners that would otherwise be dead space. A vanity with drawers rather than doors provides dramatically more usable storage for the same footprint.
Think through every category of item that lives in the bathroom — daily toiletries, medications, cleaning supplies, towels, spare toilet paper — and assign a specific storage location for each before finalizing the cabinet plan. If the plan doesn’t have a place for everything, the plan needs revision.
What the most common bathroom failures actually look like in practice
The single failure Coastalhrli sees most often on Long Island isn’t a dramatic structural collapse. It’s a shower that was tiled without a proper waterproofing membrane, discovered two or three years later when the homeowner notices a soft spot in the subfloor or a stain on the ceiling below. By that point, the remediation involves removing all the tile, replacing the subfloor, treating for mold, and starting the shower build from scratch. The original shortcut — skipping the membrane to save a few hundred dollars — ends up costing several times the original project budget.
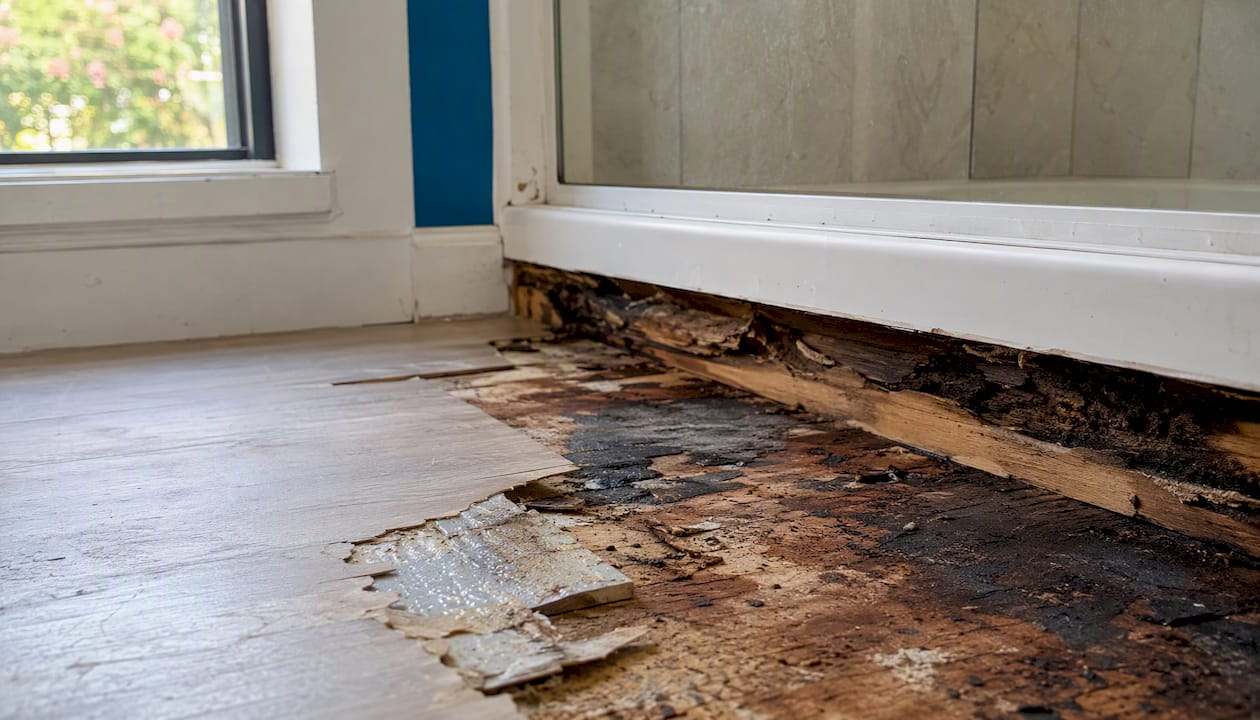
The corrective action is straightforward: require a documented waterproofing plan and a flood test before any tile goes down. That one step, written into the contract, prevents the most expensive single failure in bathroom remodeling.
A second pattern worth naming: homeowners who finalize their tile and fixture selections before the layout is confirmed, then discover mid-demo that the existing rough-in doesn’t match what they ordered. The fix is always the same — freeze purchases until the contractor has opened the walls and verified actual conditions. What’s on the original blueprint and what’s in the wall are frequently different things, especially in homes built before 1980.
Coastalhrli brings 20 years of systems-first bathroom remodeling to Suffolk County
Avoiding the mistakes above requires more than a checklist — it requires a contractor who builds the waterproofing plan, the ventilation spec, and the permit schedule into the project from day one, not as afterthoughts.
Coastalhrli has been remodeling bathrooms across Suffolk County for over 20 years, with a process built specifically around the failures described in this guide. Every project includes a documented waterproofing plan with flood test sign-off, a ventilation spec with HVI-certified fan selection, licensed plumbing and electrical trades pulling their own permits, and a milestone schedule that gives homeowners clear visibility at every phase. The result is a bathroom built to handle Long Island’s coastal humidity — not just one that looks good on installation day.
Three ways Coastalhrli reduces your risk: staged inspections at pre-cover, waterproofing completion, and final sign-off; transparent milestone timelines so you always know what’s happening and when; and a single point of contact who coordinates every licensed trade from demo through final inspection.
Ready to start without the guesswork? Schedule a consultation with Coastalhrli, or browse completed bathroom projects to see the systems-first approach in finished form. For a full picture of available renovation services in Suffolk County, the services page covers every trade Coastalhrli coordinates in-house.
Sources
These resources cover code requirements, finish selection, and planning guidance referenced throughout this article:
Recommended
Comments