
Renovation Dust Control: A Health-First Guide for Homeowners
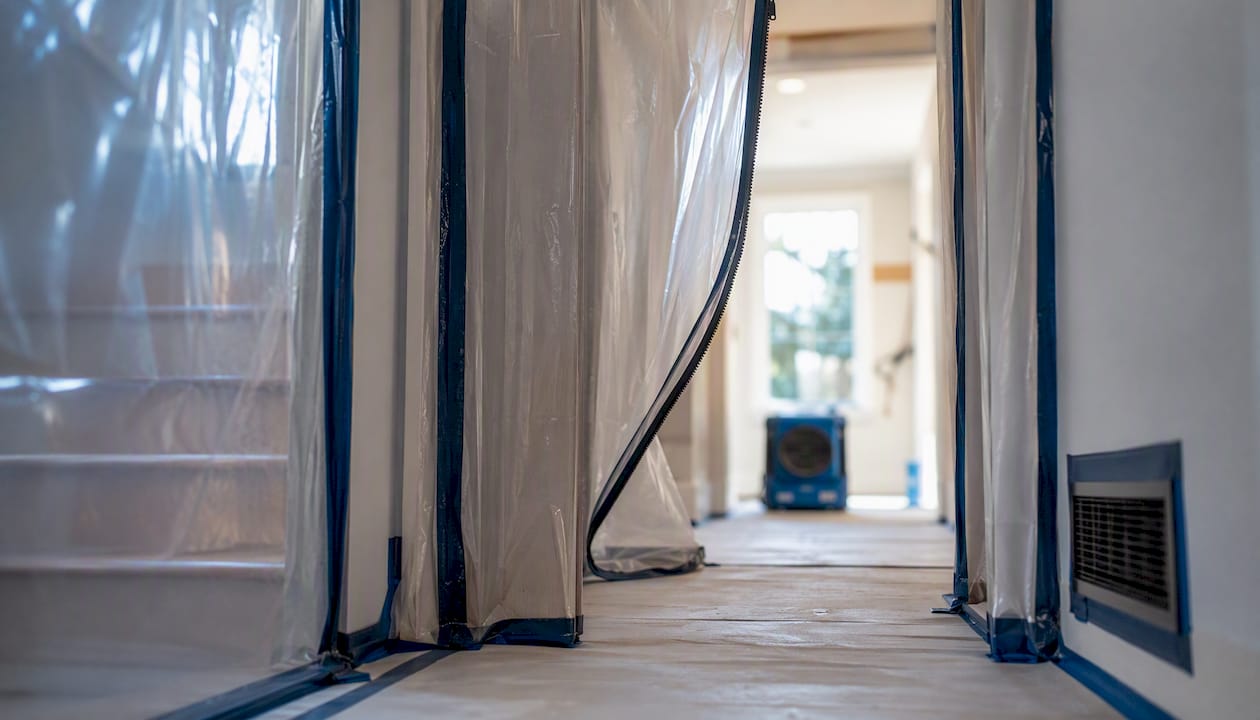
Contain the work area, filter the air, and follow EPA lead-safe cleaning verification where relevant. That’s the whole plan. Everything else in this guide is about doing those three things well.
Before the first tool swings, grab these in the first hour:
Tape poly sheeting of suitable thickness over every doorway into the work zone
Seal HVAC registers in the work area with poly and tape
Set an exhaust fan in a window, blowing out
Lay a sticky mat at the zone entry
Put on appropriate respiratory protection before any sanding, cutting, or demo
Dust from renovation work isn’t just a cleaning problem. Lead dust from pre-1978 paint, crystalline silica from concrete and masonry, and fine respirable particles from drywall and wood all carry real health consequences. The EPA’s RRP Steps booklet requires work-area containment and cleaning verification when lead-based paint is disturbed. Start with containment. Everything else follows.
Key Takeaways
Effective renovation dust control requires containment before work starts, active air filtration during the project, and a verified two-pass clean before reoccupying any room.
Point | Details |
Contain first, always | Seal the work zone with 6-mil poly, tape registers, and install a zipper door before any demo or sanding begins. |
Lead-safe rules apply in pre-1978 homes | The EPA RRP Rule requires certified contractors and cleaning verification when lead paint is disturbed in covered projects. |
HEPA filtration at every stage | Use a HEPA vac (never a broom), HEPA tool attachments, and a ducted air scrubber for any project lasting more than two days. |
Two-pass final clean | Clean once to remove debris, wait for airborne particles to resettle, then clean and verify before reoccupying the space. |
Coastalhrli for Suffolk County projects | Coastal Home Renovations manages containment, lead-safe practices, and cleaning verification for interior renovations across Long Island. |
Table of Contents
Why renovation dust control matters more than most homeowners realize
Low-dust work practices that actually reduce the problem at the source
How to set up ventilation and negative pressure that actually works
Daily cleanup and the final cleaning verification before you move back in
When you should hire a professional instead of doing this yourself
What 20 years of Suffolk County renovations taught me about dust
Coastal Home Renovations handles dust-safe remodeling in Suffolk County
Why renovation dust control matters more than most homeowners realize
Renovation dust isn’t one thing. It’s a mix of particles with very different risk profiles, and the combination is what makes it dangerous.
Lead dust is the most regulated hazard. Homes built before 1978 have a high probability of containing lead-based paint, and sanding, cutting, or demolishing those surfaces releases particles fine enough to be inhaled or ingested without any visible cloud. Children and pregnant women face the highest risk, but adults aren’t immune. The EPA RRP Rule requires certified contractors for any paid work that disturbs paint in pre-1978 housing and prohibits high-dust practices like open-flame burning, high-temperature heat guns, and dry power sanding without HEPA-exhaust shrouds.
Crystalline silica comes from cutting, grinding, or drilling concrete, brick, tile, and stone. Repeated exposure causes silicosis, a progressive and irreversible lung disease. Even a single high-exposure event can matter.
Beyond the respiratory risks, fine dust settles into HVAC ductwork, coats electronics, ruins freshly painted trim, and works its way into cabinetry and upholstery in adjacent rooms. A bathroom gut-renovation can contaminate a bedroom two doors down if containment is skipped.
What to buy or rent before the job starts
Getting the right gear before day one saves you from improvising mid-project. Here’s what actually matters, by category.
Containment materials:
6-mil poly sheeting (minimum thickness for walls and floor protection; heavier for floor traffic areas)
Ram Board or comparable heavy-duty floor protection for walkways
Painter’s tape for trim and light-duty seams; duct tape for poly-to-poly and poly-to-floor seams
Zipper door kits (ZipWall or comparable) for hands-free access through containment walls
Tack mats at every entry point to the work zone
Filtration and air management:
HEPA vacuum (true HEPA, not “HEPA-style” — the filter must capture 99.97% of particles at 0.3 microns)
Portable air scrubber or box fan with window-duct kit for exhaust
HEPA dust-extraction attachments for sanders, grinders, and circular saws
PPE:
N95 respirator for general drywall, wood dust, and light demo; upgrade to N100 or P100 for lead-paint disturbance, silica-generating work, or any confirmed hazardous material
Disposable Tyvek coveralls
Shoe covers or dedicated work boots that stay in the zone
Safety glasses or goggles
Low-dust tools:
Wet sander or misting bottle for drywall finishing
Score-and-snap cutter for drywall (no blade, no dust cloud)
Dust shroud for angle grinders
Pro Tip: Rent the air scrubber; buy the HEPA vac. An air scrubber runs $50–$100/day at most equipment rental yards and is worth it for any project lasting more than two days. A quality HEPA vac ($150–$300) pays for itself on the second project. Match your respirator rating to the hazard: N95 for nuisance dust, P100 half-mask for anything involving lead or silica.
How to set up containment before the first tool swings
A containment setup that fails on day two is worse than no containment at all. Do it right once.
Clear and protect the perimeter. Remove furniture, rugs, and anything porous from the work zone and the adjacent hallway. Cover what can’t move with poly sheeting taped at the edges.
Protect floors. Lay Ram Board or 6-mil poly on the work-zone floor, taped at seams and edges. Add a second layer of poly on high-traffic paths from the zone to the exit.
Seal all openings. Tape poly over every doorway, window opening, and wall penetration in the work zone. Use duct tape on poly-to-poly seams and painter’s tape where the poly meets painted trim (to avoid pulling paint on removal).
Seal HVAC registers and returns. Cover supply registers with poly and tape. For return-air vents, seal them during the highest-dust activities only. Leaving returns sealed for an entire multi-week project can strain the HVAC system, so monitor system performance and unseal during low-dust phases.
Install a zipper door or airlock. A ZipWall-style zipper door lets workers pass through without lifting a poly flap and releasing a dust puff each time. For heavy demo, create a two-flap airlock: one outer flap, a small transition space, one inner flap.
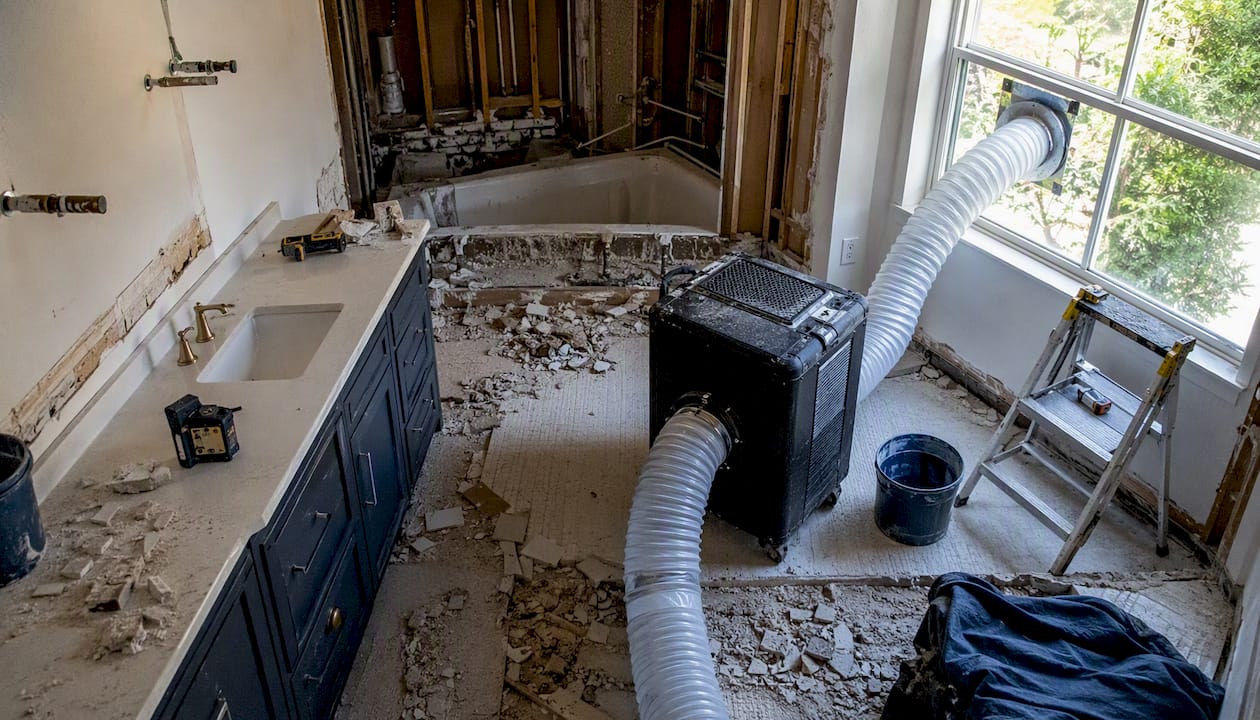
Set the exhaust fan. Place it in a window or exterior door opening, blowing out. This creates the negative pressure that keeps dust from migrating to clean rooms.
Place tack mats. One at the inner edge of the airlock, one at the outer edge. Workers step on both on the way out.
Pro Tip: For a single-room project lasting less than a week, a zipper-door flap system is sufficient. For multi-room demo or any work generating very high dust loads, the EPA recommends a fully sealed isolation with a dedicated entrance and a negative-air machine ducted outside.
Low-dust work practices that actually reduce the problem at the source
The best containment in the world still has to manage the dust you generate. These methods reduce how much you create in the first place.
Wet-sand and mist before sanding. Lightly misting a drywall surface before sanding cuts airborne particle counts significantly. Wet sanding and HEPA vacuuming instead of dry sanding and sweeping are the two highest-impact habits a homeowner can adopt.
Use HEPA dust-extraction on every power tool. Attach a HEPA-filtered vacuum to sanders, routers, and circular saws. The EPA’s RRP guidance specifically calls out HEPA-exhaust shrouds as the required alternative when certain high-dust practices are used near lead paint.
Score and snap drywall instead of sawing. A utility knife score and clean snap produces almost no airborne dust. Reserve the saw for cuts that can’t be scored.
Cut masonry and tile outside when possible. A wet tile saw on the driveway keeps silica dust entirely out of the house. If cutting inside is unavoidable, use a wet saw with a vacuum shroud and keep the work zone sealed.
Avoid prohibited RRP practices near painted surfaces. Open-flame burning, heat guns above 1100°F, and dry power sanding without HEPA shrouds are prohibited under the RRP Rule when lead paint may be present.
Plan the debris route before demo starts. Pros decide in advance whether debris leaves through a window, a garage door, or a dedicated exit, so workers aren’t carrying dusty material through finished rooms. Set up a staging area outside or in the garage.
Schedule high-dust activities on days when occupants are out. Demo, grinding, and heavy sanding should happen when the house is empty. Notify anyone with asthma or respiratory conditions well in advance.
Use a four-layer pro sequence: protect surfaces, contain the zone, control particles with filtration and negative air, then clean in phases. Treating dust control as an afterthought adds rework time.
Pro Tip: Set up a “mudroom” entry outside the containment zone: a folding table where workers leave tools, a trash bag for disposable coveralls, and a HEPA vac for vacuuming boots before stepping onto the tack mat. This one routine prevents more cross-contamination than any amount of poly sheeting.
How to set up ventilation and negative pressure that actually works
Ventilation is the most misunderstood part of construction site dust management. A window cracked open is not a strategy.
Create negative pressure with a ducted exhaust. Place an exhaust fan or air scrubber in a window or exterior door opening, blowing out. Seal around the fan with poly and tape so air can only exit through the fan, not around it. This pulls air from the rest of the house into the work zone rather than pushing dusty air out.
Provide make-up air. A sealed room with an exhaust fan and no air inlet will starve the fan and may create pressure problems. Leave a small, controlled gap (a slightly open interior door on the clean side) so fresh air can enter the zone and be exhausted out.
For heavy demo, use a negative-air machine. A portable air scrubber with a HEPA filter and exterior duct handles the volume that a box fan cannot. Negative-air machines should be ducted outside and balanced with make-up air; portable purifiers are useful for low-to-moderate dust but can’t replace a properly ducted strategy for heavy demolition.
Use a portable air purifier in adjacent rooms. A HEPA-filtered purifier in the bedroom or living room next to the work zone catches any particles that migrate past containment. Size it to the room’s square footage using the CADR rating on the box.
Don’t duct exhaust toward neighboring properties or HVAC intakes. Check local codes; some municipalities restrict where construction exhaust can discharge.
Pro Tip: Run the exhaust fan or air scrubber during all active work and for at least 24–72 hours after any high-dust event (demo day, heavy sanding). Fine particles stay airborne far longer than visible dust settles. Change HEPA filters when the unit shows reduced airflow or after any particularly heavy dust day, whichever comes first.
Fine particulate matter (PM2.5) can remain suspended in indoor air for hours after work stops. Running filtration well past quitting time isn’t overcaution; it’s the only way to clear what you can’t see.
Daily cleanup and the final cleaning verification before you move back in
Cleanup isn’t the last step. It’s a daily discipline that keeps the project livable and makes the final verification faster.
Daily routine:
Bag and remove debris at the end of every work session; don’t let it accumulate
HEPA-vacuum all walkways, the containment zone floor, and the tack mat surface
Wet-wipe horizontal ledges (windowsills, door frames, exposed studs) with a damp cloth
Inspect and reseal any tape that has lifted from poly seams or register covers
Vacuum workers’ boots and dispose of or bag coveralls before leaving the zone
Final cleaning sequence:
Pass 1 (construction clean): remove all debris, HEPA-vacuum all surfaces top to bottom, wet-mop hard floors
Pass 2 (verification clean): HEPA-vacuum again, wet-wipe all horizontal surfaces with a clean cloth, inspect under the poly for settled dust
Cleaning verification (when RRP applies): the EPA’s cleaning verification procedure uses wet wipes compared visually to a verification card. If the wipe is darker than the card, clean again and re-check. A certified renovator must perform or oversee this step when the RRP Rule applies.
Dust-wipe sampling: for pre-1978 homes where lead is confirmed or suspected, post-renovation dust-wipe sampling by a certified inspector gives you a documented clearance result.
Pro Tip: Ask your contractor for documentation of the cleaning verification result. A written record protects you if a lead-related health concern arises later, and any contractor working under the RRP Rule is required to keep those records.
The two-pass clean matters because the first pass stirs fine particles back into the air. Waiting 30–60 minutes between passes lets that airborne fraction resettle before the verification wipe.
What dust control actually costs and how to budget for it
Dust control adds cost. Skipping it adds more, in cleanup time, ruined finishes, and potential health liability.
Typical cost buckets:
Containment materials (poly sheeting, tape, zipper door kit, tack mats, Ram Board): $75–$200 for a single-room project
HEPA vacuum (purchase): $150–$300 for a contractor-grade unit
Air scrubber rental: roughly $50–$100 per day at most equipment rental yards; a week-long kitchen renovation might run $300–$500 in rental fees
Respirators: N95 disposables run $1–$3 each; a reusable P100 half-mask with cartridges costs $30–$60
Disposable coveralls: $3–$8 each; budget for one per worker per day on heavy-dust days
Post-renovation dust-wipe testing (if required for lead clearance): varies by lab and region; professional clearance testing typically runs $200–$400
Rules of thumb:
Rent the air scrubber for any project over two days; buy the HEPA vac if you renovate more than once every few years
Budget 5–10% of total project cost for dust-control materials and equipment on a mid-size interior renovation
A one-room containment setup takes roughly one hour to install correctly; the final two-pass clean adds two to four hours depending on room size
Pro Tip: The single biggest cost-saving move is buying poly sheeting and tape in bulk at a home improvement store rather than in small contractor packs. A 10-foot by 100-foot roll of 6-mil poly costs roughly $40–$60 and covers far more than the small pre-cut sheets sold near the paint section.
When you should hire a professional instead of doing this yourself
Some projects cross a line where DIY dust control isn’t enough, and the risk of getting it wrong is too high.
Hire an EPA lead-safe certified renovator when:
The home was built before 1978 and the work will disturb painted surfaces (sanding, cutting, demo)
A lead test kit shows positive results on any surface being disturbed
The project involves a child’s bedroom, a kitchen, or any room regularly occupied by children under six or pregnant women
Hire a professional for scale and complexity when:
The project involves multi-room demolition or structural demo
HVAC ductwork is being opened, replaced, or significantly modified
Exterior work is happening near a property line or involves lead-painted siding
Invasive plumbing or electrical work requires opening walls in multiple rooms simultaneously
Hire a specialist when:
Asbestos is suspected (any insulation, floor tile, or ceiling texture in a home built before 1980)
Large-volume concrete cutting or grinding is required indoors
A previous renovation left visible dust contamination in ductwork
Questions to ask any contractor you interview:
Are you EPA RRP certified? Can I see your certification?
What is your containment setup for this project?
How do you handle cleaning verification after the work?
Will you provide documentation of the final clean?
How do you route debris out of the house?
For DIY door replacement and other limited-scope work, the dust risks are lower but still real, particularly around lead paint on door frames in older homes.
What 20 years of Suffolk County renovations taught me about dust
Most homeowners underestimate one thing: how far dust travels. Not the visible cloud you can see settling on a drop cloth, but the fine fraction that stays airborne for hours and finds its way through gaps you didn’t know existed.
The sequence that actually works is the one this guide describes: plan the debris route before demo starts, seal the zone before the first tool swings, run exhaust during work and well after, and clean in two passes. Skipping any step doesn’t save time; it creates rework.
The local lesson from Long Island projects: older housing stock here means pre-1978 homes are the rule, not the exception. Lead-safe practices aren’t a bureaucratic add-on. They’re the baseline for responsible work in this market. Any contractor who treats containment as optional or cleaning verification as a formality is cutting a corner that matters.
Coastal Home Renovations handles dust-safe remodeling in Suffolk County
Dust-safe remodeling requires planning that starts before the first tool is unpacked. Coastalhrli’s interior renovation services cover kitchen, bathroom, whole-home, basement, and attic projects across Suffolk County, with containment, lead-safe work practices, and cleaning verification integrated into the process, not added as an afterthought.

For homeowners who’d rather not manage poly sheeting, air scrubbers, and EPA verification paperwork themselves, Coastalhrli handles the full scope: containment setup, phased cleaning, and documentation. With over 20 years of experience on Long Island, the team knows how to protect occupied homes during active renovation work. See the full range of services or request a consultation to get a clear scope and timeline for your project.
Sources
This article is general information, not a substitute for advice from a qualified doctor. Consult a qualified healthcare professional about your own circumstances before acting on anything here.
Recommended
Comments